1. Starting Phoenix Mail
If you have successfully unzipped the PhoenixRR executable, made the necessary shortcuts in your Start menu and/or Desktop, double-click Phoenix Mail's icon.
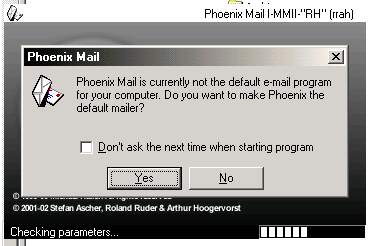
Most likely you will be presented with a dialog like this:

Woops?Wha's that?
Phoenix Mail can be made as your default mailer which gives you the additional
advantages:
- If you click any mailto: link on a webpage, Phoenix Mail will automatically
create a new e-mail to the person the mail has to be send to.
- If you want to send attachments directly from Explorer using the Send To
feature, Phoenix Mail will automatically generate a new e-mail for you with
the attachments of your choice.
It's up to you here. Make sure you check the 'Don't ask the next time...'
checkbox.
Regardless if you press Yes or No, Phoenix Mail will take some extra time
to load when you start it in a 'clean folder': this is particularly because
Phoenix has to create and set up a new folder structure.
2. Adding your account(s) to Phoenix Mail
When the main window pops up you'll likely see the tips dialog pop-up, saying
that 'Before you start you have to make your ...' etc, etc. Also notice
the warning in the statusbar. Press Close (you may want to keep that 'Show
at Start' checkbox checked of that Tips dialog).
Phoenix Mail will automatically detect that you have to set up an account
first and presents the 'Account properties' dialog. This dialog has
5 (so-called) tabs. Start filling out the information in the General Tab but
keep these things in mind:
1... The Account name will also show up in the 'Accounts/Folder' panel, so
give it a meaningful name, for example the name of your provider.
2... In the Receive /Send Tabs you should fill out the data your provider has
sent you: you need to know your password, username and the POP3 / SMTP
servernames. As a sidenote or tip: there's a checkbox 'Prompt for password'.
I recommend leaving this checkbox checked. This way you won't forget your
password which saves you expensive calls to TechSupport.
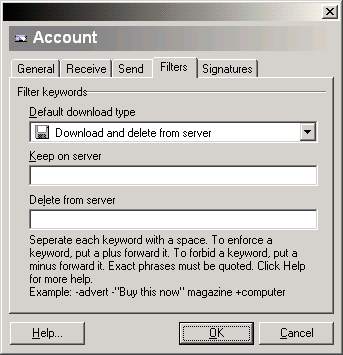
3... You can skip the Filters section for now.

Ummm... Account filters?
Using Account filters works almost the same as using 'Folder filters', but
that's something for later.
4... You may want to add a (default) Signature for every
account (instead of adding them manually when editing a new mail). However,
you can't add it right now: Since you're starting from scratch there are no
signatures available yet.
Now press OK and watch Phoenix Mail generate your new account info.
3. Checking out the main window
You're now in Phoenix Mail's Main window. Watch the 'panel layout': the
default layout (so-called 'Roman Left') shows the folders on the right
hand, the message list on top and the editor on the bottom.
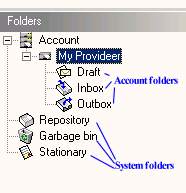
But back to the folder and the recently created account: check the
Account/Folders panel:

There they are!
As you see, Phoenix mail has created several folders automatically. There are
account folders and so called *system folders*. Account folders are folders that
can be deleted (no really), System folders *can never be deleted* (not from within
the mailer).
Now, if you've made a typo in the Account Property dialog, select the Account in
the Accounts panel, right-click and select the 'Properties...' menu item and click.
See? There's that dialog again!
Press OK to apply your changes. Or press Cancel.
4. Conclusion
You have now succesfully completed the first tutorial, hit your browser's back button to get to the next tutorial!